COME VISIT OUR NEW ONLINE HOME!

Come visit us on our new Jewberly Emiris blog home!

All new content is over on www.jewberlyemiris.com
Showing posts with label DIY. Show all posts

Sunday, June 18, 2017

(A Dress That Was) A Long Time Coming... {Vogue 9201}


After two months of slowly stitching...I'm so excited to show you my rendition of Vogue 9201!
It has been a long time coming. 
Thankfully, I'm still as in love with it (or even more in love!) then when I cut it out on March 30th!
I use the word "rendition" purposefully. Because it really does feel like my interpretation of the pattern....


My original plan was to sew view B with the long sleeves, cute cuffs and the midi length...
When I accidently cut the (maxi) skirt length of C; I decided to leave it go and see what I thought about it in the end. Throughout the try ons and fittings I just couldn't see the stripes chopped off and ending just below my knee.
Unfortunately, the added length was causing me to rethink the long sleeves. Even with the idea of the white cuffs it was it was going to be too much.
With just the sleeves, hem and collar to go during one of my last try-ons in May, the solution finally clicked! 
  • SLEEVELESS. 
The vibe was "sophisticated beach".  Something I'd feel comfortable in walking around the beach; barefoot of course after a long day at work. (Not that there are any beaches in Nebraska! haha)
With that in mind I used bias tape to bind the edges of the armholes and loved the result!


The stripes also caused some issues at the waist seam...
Despite my efforts for matching the stripes at the seam...it just ended up looking off. A few matched perfectly...some did not. Most of the stripes were straight down as an arrow and some were going at a diagonal. This may make it sound like a cutting issue but it's just the way the grainline of the pieces worked with the princess seams and skirt. 
The answer to this was a basic white sash to pull the collar in and break up the stripes without confusing the eye.
For the fabric belt I copied the length and style of my favorite vintage tie-belt. 


You may remember that Vogue 9201 is on my #2017MakeNine list! Only eight more to go!...eeek. I'm not going to get my hopes too high of finishing them all. I mean it's June the middle of the year and I just finished the first item. :-l

-'- Jewel


  • STASHBUSTING SEWIST SECRETS:
  • PATTERN: Vogue 9201
  • FABRIC: $5 thrifted sheet from Goodwill in Texas / Collar & Sash: Recycled Pillowcase
  • NOTIONS: INVISIBLE ZIPPER - WALMART / /  Buttons: Joann's
  • RATING: SUCCESS! 
  • FABRIC STASHBUSTED ON PROJECT: 5 YARDS
  • FABRIC STASHBUSTED SINCE JANUARY 1ST 2017: 25 3/8 YARDS

Tuesday, April 04, 2017

The Hip Bohemian Overall [Dungaree] Dress

This "overhalls" (as my late German farmer grandpa would have said) dress has been a long time coming! We bought this Oshkosh B'Gosh Dungaree dress at a Goodwill in 2013. 

You can see most of the dress as it was originally in the collage below. (McClellan Singing Sisters were performing for a "Hillbilly Jamboree - otherwise, we don't typically dress that way to sing!)


One day I was really inspired by some of the light washed denim items I'd seen and wanted to bring this dress out of its farmer-ness. I prepared a Rubbermaid storage tub with water and bleach and put it in to soak and made two big mistakes.

#1. I didn't realize I was using concentrated bleach instead of the cheap stuff.

#2. I left it in the tub for WAY too long.

You may say a third mistake was bleaching it at all, and perhaps you would be correct.

The large amount of concentrated bleach had broken down the fabric and caused several of the metal buttons/clasps to rust. It also hadn't bleached evenly and instead of a light-washed denim overall dress to pair with a grungy t-shirt and sneakers, I had this.


It had several rust spots on the back side which I attempted to disguise using fabric paint (a poor choice). To add insult to injury, I was impatient! Instead of waiting until I had another color on hand, I painted bright red geometric triangles. ...and instantly hated it.


I tried finding appliques or other paint ideas but nothing could salvage this mess. Several times I made up my mind to throw it away or re-donate it but Jewel stopped me. I'd all but given up hope of ever making this more than just a painful learning experience until this past Sunday.

I stopped by JoAnn's after church to buy extra-thick black belt elastic (for a project coming soon) and on my way to the checkout counter I saw these new iron-on appliques that were perfect. They were $6.99 each for a package of 3, but I had two 50% off any one item coupons so I basically got a package free!


With some very careful arranging, I was able to cover up each of the red eyesores on the back and the main rust spot on the front. And while applique on the front did its job, it looked a bit lonely and out of place... which gave me another idea.

My boyfriend's family recently made a trip to San Antonio and brought me back a few gifts. One was this cute little coin purse.


I decided it would made a very cute pocket applique to help pull the front together. Sewing through two layers of (thinner) denim and the elaborate embroidery wasn't easy but it came together slowly.


The headband is from Nicaragua, gifted to me by my brother-in-law's family. The tiny-people-dancing brooch is from Peru, given to me by my dear friend Hannah who lives as a missionary in Iquitos.


It needed one final touch so I went through our stash of lace and trims and found a 1970's bright red polyester floral trim originally from our Grandmother's stash to add to the hemline. 


I am so happy with how this DIY project FINALLY came out! While Jewel walked me through using her sewing machine again, I did all the actually cutting and sewing myself! (Which is why it doesn't look as perfect :) but that's okay. It fits with the quirky, hippie feel I ended up with!) 


I purchased the woven leather shoes in Nicaragua in 2015 - US size 8.5 is hard to find in Nicaraguan artisan shops!


The colorful Mexican purse was another souvenir from my boyfriend's Texas trip.

Cost Breakdown (not including bleach or thread)
Thrifted Dungaree Dress: USD $3.99
Iron-on appliques: USD $13.98
Red floral trim: free!
Embroidered coin purse-turned-applique: also free!

Total spent out of pocket: USD $17.97

Sunday, April 02, 2017

March Stashbusting & Pattern 'N' Fabric Fast Round-Up

Wow! Another month is over and stuff has been happening here at home base!

Fabric sewn:
3 yards of flannel for pajama pants for TaMera (not blogged)
1 5/8 yards gray/blue chambray for Tania culottes

Purchased:
1 yard-ish of dark navy twill.


I was thrifting at Goodwill in Texas and found the twill for $1.99 but the tag was red! (Tag color of the day) Ninety-nine cents for suitable fabric for shorts to practice on? Yes, please! With everything else stashbusting I've been a very good girl, though. ;)

This month 1 yard of fabric in and 4 5/8 yards out! 

All fabric purchased in 2017: 6 yards
All fabric sewn in 2017: 20 3/8 yards

Total fabric stashbusted: 14 3/8 yards! Yes, getting there!


Pattern Fast:


I purchased a single pattern this month...I couldn't not purchase the brand new Flint pattern from Megan Neilsen patterns! Love it so much and I talk about it here in my Sewing Desk Sit-Down video. Be expecting to see my version in May!

But...I also de-stashed 28 patterns this month! Some as far away as Sweden! I "sold" them for shipping in the We Sew Retro Buy, Sell & Trade group. I really look at it as giving them away since I didn't want to make money but understandably I also didn't want to lose any money with the shipping cost.

I'm going to keep trying to think of different ways to get through the pattern stash and get it under control.


For April, I'm already off to a great start as I finished a dress yesterday and it's only the second! :D
-'- Jewel

Wednesday, February 01, 2017

January Stashbusting & Pattern 'N' Fabric Fast Round-Up

January is over and it is time to gather up the information of the past month and see how well I did!
If you've been following my blog for awhile you know I'm trying to sew through my stash of mostly gifted fabrics. My grandmother, grandma, and Mom gave me their stashes when I started sewing since they had all quit many years prior. So...it's a bit overwhelming.

This year's stashbusting goal is to sew through 100 yards of fabric!
All fabric purchases will be subtracted from the sewn amount so it's not just sewing 100 yards it's getting rid of 100 yards!

As another goal, I made a personal pledge for a pattern 'n' fabric fast. On November 12th 2016 with the follow sewists and stashbusters of Stashbusting Sew-A-Long as my witnesses I said:


  • "✋🏼 "I, Jewel McClellan. A dedicated sewist and lover of fabric and patterns. From this moment on will buy no more patterns and/or fabric until 2017. 
  • I will restrain from online window shopping and every time I get an urge to do so will sit in front of the fabric shelf or pile the baskets of patterns around myself to be overwhelmed until the said feeling passes."

After a successful month and (about) a half with great expectations I decided to extend it to June of 2017.

I'm confessing to you today...I have broke it. Not with fabric. No! But with a few patterns... I know...I know I said I wouldn't. :( 

I was in the car with (my sister) Tiffany, checking my email and there was a JoAnn's sale email...

I clicked to find when the patterns were going to be on sale. (Bad, bad choice Jewel!) 
Getting to her house I got on the computer and started browsing to see which ones I should get. Again...setting myself up for failure...


I only purchased a single pattern for myself. Simplicity 8248 a 1930s reproduction pattern. Since it came out I've been drooling over it and seeing so many different versions in my head! 
I've also been watching Miss Fisher's Murder Mysteries an Australian show that's based in the 1920s (currently on USA Netflix) and love the fashion! 
From a production element, I love how they put Miss Fisher (the leading lady) in rich, true and bright colors as the rest of the cast are in browns and neutrals.


The deal breaker for me was finding this pin on Pinterest! How gorgeous is this dress?? The design elements of the pattern and dress are so very close! I'm pretty sure I can make it! 


I also wanted to get some patterns for TaMera. I know so much more about her personal style then before. Many of the patterns I've previously purchased for her she wouldn't wear. She may "like" them but that doesn't mean she'd like to "wear" them. Big difference. Finding your personal style could possible be the hardest thing about fashion. At least I think so!

Burda 6551
I chose this pattern because TaMera wears a lot of button-ups. (Not necessarily what I'd chose for her to wear but again this about HER style.)
Simplicity 8214
This is a cool little pattern! It's a jumpsuit and dress pattern that can be easily transformed into a coordinating outfit. With a jumpsuit pattern you don't have to worry about your shirt untucking and such.
Burda 6549
One of TaMera's favorite ready-to-wear (RTW) dresses is very similar to this style. I'll just have to raise the neckline for comfort's sake.


These three are for Tiffany and she chose them herself. Tiffany can still wear clothes that she wore 5-7 years ago. (Yes...don't we all wish we could say that!) She's just tried of her closet and for good reason too! She only buys three maybe four new garments a year so she has a reason to be. I hope to start bringing some more custom-made garments into her wardrobe these coming years.


My fabric stashbusting efforts on the other hand were much better. 

0 yards of fabric in and 8 yards out!

Items sewn:

2 Lissette Dress for Hannah (I'll be sharing all four in one blog post soon) - 6 yards
TaMera's Sweater for the Wardrobe Project - 2 yards 

I have a few un-finished projects I'm still working on so February's totals should be a little higher then January's! Here's to hoping anyway. ;)
-'- Jewel


Tuesday, June 07, 2016

My Plans for the Seasonal Sew Wardrobe: Sleepwear Edition


Hopefully, your starting to pull fabrics, reaching deep into your stash to pull out your pajama patterns and planning your sleepwear sewing! 

I actually have an entire box where I've been sticking sleepwear type fabric and a smaller box to store the pajama patterns I find here and there. 

So without further ado...here are my initial sewing plans in no particular order, whatsoever!

Saturday, June 04, 2016

Overall Dress - Vintage Simplicity 7006 {SSW1}


This project started unlike any other and it could not of happened without the help and love of friends.
You may be thinking that I'm stretching the truth but I'm not! 
The main fabric was found at a garage sale by my sister who lives in Texas.
The pattern was from a sweet friend who found it thrifting.
The scraps of fabric I used for the lining and facings was from my Grandmothers stash and the only thing I actually bought was the overall buckles, top stitching thread and buttons!
Much different then my other projects.


Saturday, March 12, 2016

Kiomi Dress in Everday Style by Lotta Jansdotter


Two things about this project make me excited!

First: it is knits month in the stashbusting group and this dress was made with a knit fabric!
(More on that later)
Second: this is the first project I've sewn from my new book Everyday Style by Lotta Jansdotter. Fran, a fellow member in the Sewalong & Sewing contests group, brought it to our attention and I thank her for doing that! I have a good feeling that the patterns in this book will get a lot of use!


When I received my copy of Everyday Style in the mail,  I started mulling over ideas for the various sewing projects that I now had access to, and asked Kimberly if there was a project she would like/wear. 
One of them was the Kiomi Dress...excitedly I said, "Go find some fabric"! 
I enjoy sewing for my sisters and I don't do it enough so I was happy to be able to get something stitched up for her!

Tuesday, November 03, 2015

Reflections on Sew With Me September (The Sew-A-Long)


Overwhelmed with blessings.

That's seems to describe what I'm feeling.

I haven't formally announced it but I was the winner for the "Sew With Me Sew-A-Long". I think the reason being; I was am still in shock.

I won the Sew-A-Long with an ensemble of red heart cotton printed fabric that I used because I was bothered by it still being in the stash!

One of the things I enjoy about the Sew-A-Long group is you aren't judged by your sewing experience or how well you did. If you finish the project (In September's case, four coordinating pieces) by the end of the allotted time (and share it with the group) you are entered to win!


The Prizes

In no particular order I'm going to share the prizes!
Some of them were predetermined and others were chose from a list.

http://www.frocksandfrolics.com/boxybag.html
Source

The Boxy Bag from So Sew Easy (PDF Pattern)

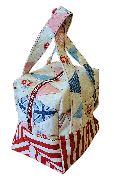
In the midst of making my Cargo Duffle Bag, Dad mentioned that he'd like a better bag for his gym stuff. Right now, he's using a square tote bag which he likes the size of but wishes it had a zipper and some stability in the sides. I'm pretty certain the Boxy Bag made bigger will be the answer!

Had to share this adorable patchwork one that I found online! -->
(Click on "Source" to go get more info on the bag pictured)


Source

Angelina Shorts from Itch To Stitch (PDF Pattern)

I used the process of elimination for the pattern from Itch To Stitch!
She has some great patterns and this was the only way that seemed logical for me to get her an answer in a timely manner. 
The Angelina Shorts won out because I can't recall ever seeing a shorts pattern like this before. 
I love the golden buttons and am wishing it was closer to warm weather so I could stitch some up!


Zaria Flow Skirt from Named Clothing (PDF Pattern)

Named Clothing let me choose a pattern from their 2 recent collections. Let me tell you...that was still too broad of a choice range! They have amazing patterns in both that it was still an incredibly hard decision. I enlisted Kimberly's help and we got it narrowed down to this 2 in 1 skirt pattern.

The pencil skirt version, has some cute top-stitching detail! I'm starting to figure out that I love small details in clothes! 


Finlayson Sweater from Thread Theory 

Thread Theory is focused on getting quality menswear patterns to the home sewer and I couldn't be more pleased!

Thread Theory's pattern packages are the coolest! They come in a folder instead of an envelope, they include a garment tag for your make and a booklet full of the instructions and other useful information!
Cannot wait to get started on sewing my first piece of menswear!


Cross Body Bag from So Sew Easy (PDF Pattern)

I've got the bag making bug while stitching up the Cargo Duffle and I wanted to have something more challenging up my sleeve. When I saw the Cross Body Bag which includes zipper pockets, a metal enclosure, adjustable and removable straps...I said
"This is it!"


Fabric from Elliot Berman Fabrics

Wow. It's the most beautiful fabric I have ever seen! It is stunning! 
Top Fabric: Digital Print Wool Silk Gazar from J. Mendel
Middle Fabric: Italian Cashmere Angora Wool Coating from Calvin Klein
Bottom Fabric: Classic Satin Brocade from Chanel


A cool tidbit is I had been looking for a online dealer with wools and finer fabric and here one gets dropped in my lap!!

Wow, it was such an amazing experience and I really need to get to sewing some if these!

Smiles!
-'- Jewel

Friday, April 10, 2015

Easy Way To Save A Ripped Pattern Envelope

Tiffany and I went thrifting together earlier this year and I bought this pattern for her. 11¢ with tax! (Oh, yeah!) I'm hoping to make her one of these suits, sometime!

The pattern envelope was in really bad shape. Bad enough that I couldn't even get the pattern back into it. :-/ This wasn't going to work...

Time to figure out a solution.

I have to partly thank Patti for the solution.
(Patti donated the caftan pattern to her Salvation Army where I bought it in The Kearney Pattern Haul)
Miss Patti had her patterns in document envelopes and that's where I got my idea!

Supplies:
- Glue
- Scissors
- 6 x 9 inch envelope (I found 8 for a dollar at Dollar Tree) (Similar here)

Step 1: Remove everything from your pattern envelope.
The pattern pieces and instruction sheet. Everything should be out and set to the side.
Step 2: Cut the pattern envelope down the sides.  I followed the crease to get a nice cut. :)

I will now refer the pattern envelope as the front panel and the back panel.

Step three: Apply glue to the back of the front panel and lay it down on the front of your 6x9 envelope. Start from the middle as you press down to help keep from getting creases.

Step four: Repeat step three but with the back panel.

Step five: Simply, let your glue dry before putting the pieces and instruction sheets back in!

Tips: Because my envelope was so ripped I took some glue on a cotton swab and swept the glue over the rips and tears. This helps keep them from ripping more or completely off.
 And all the pieces fit again! I also redid the envelope of the caftan pattern and now it fits into my pattern box!
Happy Weekend,
-'- Jewel

Friday, March 20, 2015

Pocketbook ReFashion


Supplies:

- Pocketbook
(Found mine in the $1 bin at Shopko Hometown)
- Paper of your choice.
(I used 12x12 scrapbook paper)
- Glue or Mod Podge
- Binder Clips
- Scissors
- Stamp and Ink (Optional)

Step 1. Is obviously, remove the cover. :)

Step 2. Take your book and lay on top of your paper. Trace the book on the wrong side of the paper with a pencil. Make sure to trace the back, the bind and the front. Cut out your trace.

Step 3. Line up one side of your paper with your book. Clip and flip.

Step 4. Glue on the bind.

Step 5. Put the clips on the binder and wait for glue to dry. (I waited about 30 minutes)

Step 6. Glue remaining sides of paper to outside of the book. Place clips on each corner.
Since, I only had two clips; I switched them to the other two corners after about 15-20 minutes.

Step 7. Carefully trim up edges.

Step 8. Decorate the front however you like. I used a stamp and black ink.
(The stamp is a Thrift Store Score I found in a bundle! I'll be sharing the bundle soon!)
 

I'm using it as a sewing notebook. Writing down ideas, measurements, and future sewing related projects!
-'- Jewel

Come visit us on our new Jewberly Emiris blog home!

All new content is over on www.jewberlyemiris.com

Blog design by Simply Saluma Designs